Here is a creamy and moist cake that anyone can make. Homemade cakes are amazing, the aroma, the texture and sharing it with family makes all the efforts worthwhile.
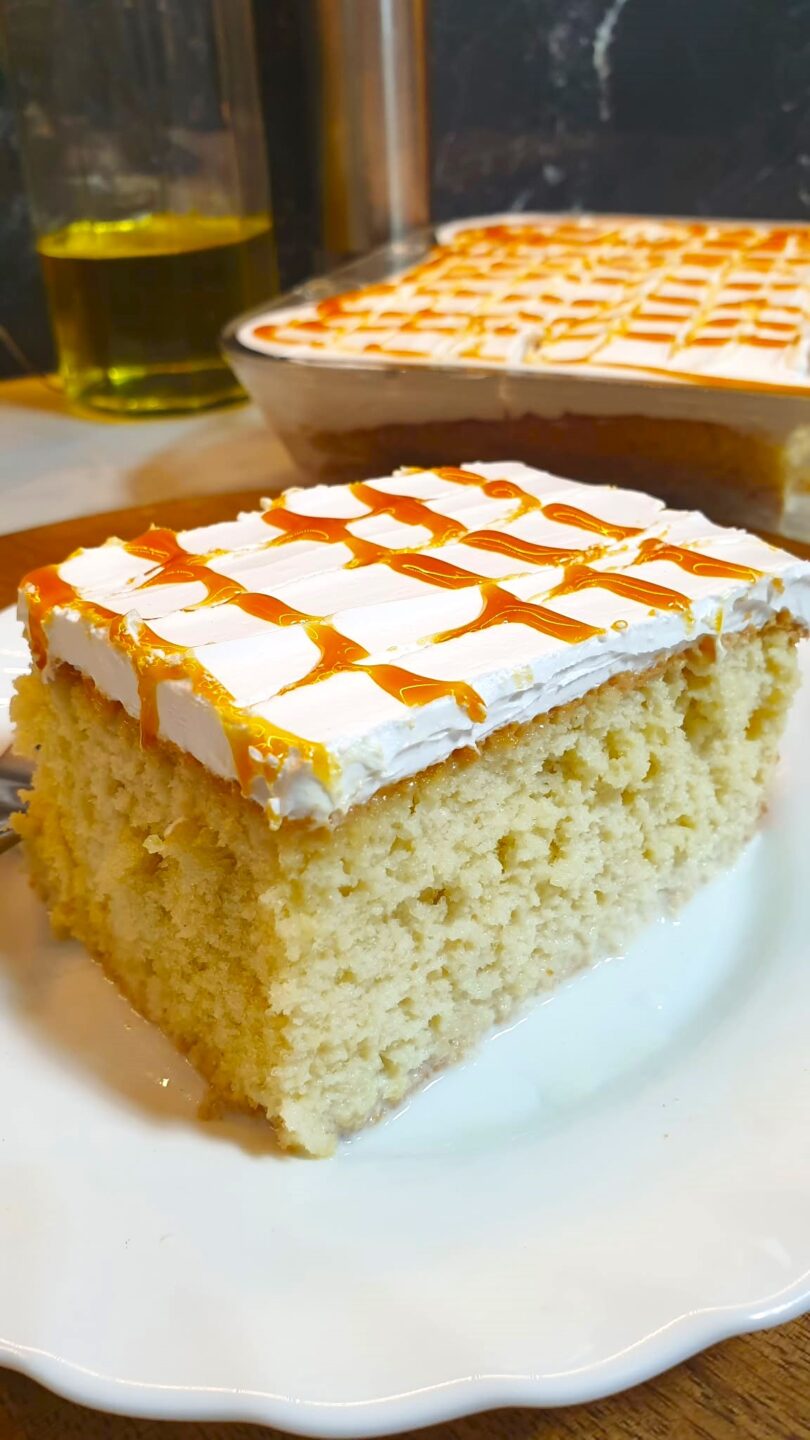
“Try this 3 Layer Milk Cake-The Fluffy, Creamy and Easy Cake with no Oven recipe. A simple, creamy and delicious homemade dessert without baking.”
So, many think that one needs to use an oven in order to make the perfect cake. But what if I tell you that you don’t need an oven? Yes! Today I am sharing with you the recipe for 3 Layer Milk Cake which you can make on your stovetop using a simple cooking pot.
This cake is incredibly moist and creamy in texture and has a lovely flavor. It’s the perfect cake for any occasion be it birthdays, parties, tea time, or just as a simple sweet treat.
The best part is that the ingredients are easily available, so no worries about that. You don’t require any special baking tools to make this dessert. If you have a big pot, a baking pan and few basic ingredients, you are good to go.
What is Three Milk Cake?
Three Milk Cake is a sponge cake that is baked until fluffy and is then soaked in a three-milk mixture which is why it is called Three Milk Cake. The cake will soak up the milk to become incredibly moist and every bite is like biting into fluffy, creamy perfection.
The milk mixture will make the cake taste light and milky. Once it has chilled in the refrigerator, the cake will taste even better. Many love this cake as it appears fancy, yet is one of the easiest cakes to make.
Why no oven for this cake?
Well, it isn’t everyone who has an oven at home. Many people don’t wish to use their oven especially in hot weathers. It is easier, quicker and of course more economical to make the cake on the stovetop. The heat trapped inside the pot becomes like the heat inside an oven. The cake will bake slowly on low flame. You can use this technique for baking various cakes.
Check this Carrot Dessert recipe Scrumptious and Thick Carrot Dessert | Gajar Ka Halwa Simple
Ingredients For The Cake You will need the following ingredients to make the cake:
• 1 cups all-purpose flour
• cup oil
• 1 cup sugar
• 4 eggs
• 1 teaspoon baking powder
• teaspoon baking soda
• A pinch of salt
• 1 teaspoon vanilla essence
All these ingredients will help you make a light, fluffy sponge cake which will absorb the milk mixture and not break apart.
Ingredients For The Milk Mixture For the milky sauce:
• 3 cups milk
• 100 ml fresh cream
• 3 tablespoons sugar
• 2 tablespoons butter
These ingredients make a yummy, moist milk mixture for your cake.
Ingredients For The Topping You will need this for the topping:
• cup fresh cream
You can also add other decorative items like:
• Chocolate shavings
• Fresh strawberries
• Sliced mango
• Chopped nuts
• Sprinkles
The topping is optional, but adds another layer to your already amazing cake.
Step 1:
Make The Cake Batter For the cake batter, take a mixing bowl and beat all the wet ingredients (oil, sugar, eggs) for 2 minutes until they look pale and slightly fluffy.
In another bowl sift all the dry ingredients (flour, baking soda, baking powder, salt).
Sift them together so that they don’t lump together. Add them slowly to the wet ingredients and gently fold everything together.
DO NOT OVERMIX.
Overmixing will make the cake dense. Add vanilla essence and gently fold it with the batter. Your cake batter is ready.
Step 2: Bake The Cake Pour the batter into a baking pan and then grease your large cooking pot with some oil or butter and place a wire rack or a stand inside it (if you don’t have one you can make a stand using aluminum foil) so that the cake pan does not touch the bottom of the pot directly. Place the baking pan in the pot on the stand. Cover it with a lid. This lid must fit snugly to ensure that heat gets trapped inside.
Step 3: Cook The Cake Now, place the cooking pot over very low heat on your gas stove. Bake the cake for 35 to 40 minutes. Do not open the lid frequently as this would release the trapped heat and result in a poorly cooked cake. After about 35 minutes, check if the cake is done using a toothpick. Insert a toothpick into the center and if it comes out clean, the cake is baked. If not, let it bake for a few more minutes. Once baked remove the cake from the pot and let it cool down completely. This cooling process is very important. A hot cake will not absorb the milk well.
Step 4: Make The Milk Mixture For the milk mixture, add all the ingredients (milk, cream, sugar, butter) in a saucepan. Place it on low heat and stir continuously until all the ingredients are mixed properly and sugar is dissolved. Do not boil the mixture excessively. Once all the ingredients are dissolved, take it off the heat and let it cool down completely. It should be cold when you add it to the cake.
Step 5: Soak The Cake Take the cooled cake and poke holes all over with a fork or a skewer. This will help the cake to absorb the milk mixture well. Now slowly pour the milk mixture all over the cake, gradually. Give the cake some time to absorb all the milk. The cake will soak up a lot more milk than you would expect. Once you’ve added all the milk, place the cake in the refrigerator to chill for at least 1 hour (2-3 hours is even better). The longer it chills, the more it will soak up the milk.
Step 6: Add Cream Topping Take your cup of fresh cream and whip it until it’s fluffy and peaks form. Spread this cream evenly over the cake. You can garnish the cake with some chocolate shavings or fresh strawberries etc. To make it look more appealing.Serving The Cake Serve this cake cold. It tastes best this way. The cold milk soak, the soft cake and the fluffy cream topping make it the ultimate dessert. Cut the cake into squares and serve it chilled. People will be astonished when they learn that this cake has been made in a pot without an oven.It is visually pleasing and so delicious.
Helpful Tips For A Perfect Result
1. Always use fresh ingredients for the best taste.
2. Measure the ingredients accurately.
3. Ensure that you keep the flame on very low.
4. Do not rush the cooling of the cake or the milk mixture.
5. Ensure that the lid of your cooking pot fits tightly.
6. DO NOT overmix the cake batter.
7. Always let the cake chill for at least 1 hour before serving.
Common Mistakes To Avoid
1. High heat- Using too much heat can burn the bottom of your cake.
2. Hot milk mixture on warm cake-This can make the cake too soft.
3. Skipping the chilling time- This is not a good idea. You must chill the cake.
If you can, put it away to chill for a couple of hours. The more you chill it, the more flavor it will have.
Step 7: Add The Cream Topping.
Take the fresh cream and whip it into soft peaks. Spread this whipped cream all over your cooled cake. This creamy layer gives it a smooth top layer that complements the milky sponge. You can decorate it with any way you like or serve it without anything. Chocolate shavings look so good, or a dollop of fresh fruit can bring some color and freshness. Take your pick! Serving The Cake. Serve the cake cold. It tastes the best when cold. The cold milk, soft sponge, and the cream make a perfect combination.
Cut into squares, serve with tea, coffee, or a glass of milk. Guests often cannot believe you made the cake on the stovetop and you will always get asked for the recipe!
Handy Tips for Perfect Results. To get the best possible results try these simple tips:
Always use fresh eggs.
Carefully measure your ingredients.
Keep your flame on low, when baking the cake.
Don’t skip the cooling time for the cake.
Make sure your milk mixture has cooled completely before pouring it on top of the cake.
Use a lid on the pot you bake it in to seal in the heat.
Don’t overmix the cake batter and give it time to cool.
If you follow all these, you’ll have the perfect cake!
Common Mistakes to Avoid.
A lot of beginners make a few silly mistakes that are easy to correct:
One common mistake is using high heat when baking the cake; this often burns the cake bottom, while the inside will remain uncooked. Another common mistake is pouring a hot milk mixture onto the cake that has not cooled off yet. This often leads to a soft cake texture. Don’t skip the chilling time because the cake needs it to absorb all the liquid.
Patience can always be your friend! Why Everybody Loves This Cake. This cake is very popular, for both kids and adults: It’s so soft; It’s so creamy; It’s a rich cake without being heavy; It has that melt-in-your-mouth texture due to the milk soak; It’s a beautiful cake;
This is often a dessert served at birthdays, family gatherings, or during Eid as well as an after-dinner treat. People who try it are guaranteed to make it again and again!
Check this also The Best Trileçe (Turkish Milk Cake)
Conclusion.
This Oven-less Three Milk Cake proves that you don’t need a fancy oven or a high-level of skill to make a dessert worth showing off!
Using basic ingredients and following the directions will make you a mouth-watering cake every single time. The perfect combination of a soft, melt-in-your-mouth sponge, a rich milky sauce and creamy topping. Every mouthful you take is so moist and sweet. I believe this is a perfect recipe for people who are baking a cake on the stovetop for the first time! Make this for your loved ones and share it with them. One thing is for sure, once they have tried it, they will be asking you to make more.